Documentation
Using Switchyard
Everything the app does, where to find it, and the keys that reach it. The app's Help button (the in the top bar, or F1) opens this page.
Getting started
Switchyard runs the git on your PATH for everything it does, so your
configuration, credential helpers, SSH keys, commit signing and hooks all behave exactly
as they do in a terminal. Install Git for Windows first if you have not. Switchyard needs
Git 2.31 or newer: without Git, or with an older one, the window says so, with
Get Git for Windows and Check again.
- Open a repository — Open at the top right, or Ctrl+O, and pick any folder inside a Git checkout.
- Or clone one — Clone repository… on the welcome screen or in the repository menu, or Ctrl+Shift+O.
- Or start one — New repository… on the welcome screen or in the repository menu. A folder you open that is not a repository yet offers Make it a repository…; nothing in it is changed.
- Read the history in the middle, work on changes on the left, and see any commit on the right. The panels can be moved; see Layout.
The command palette
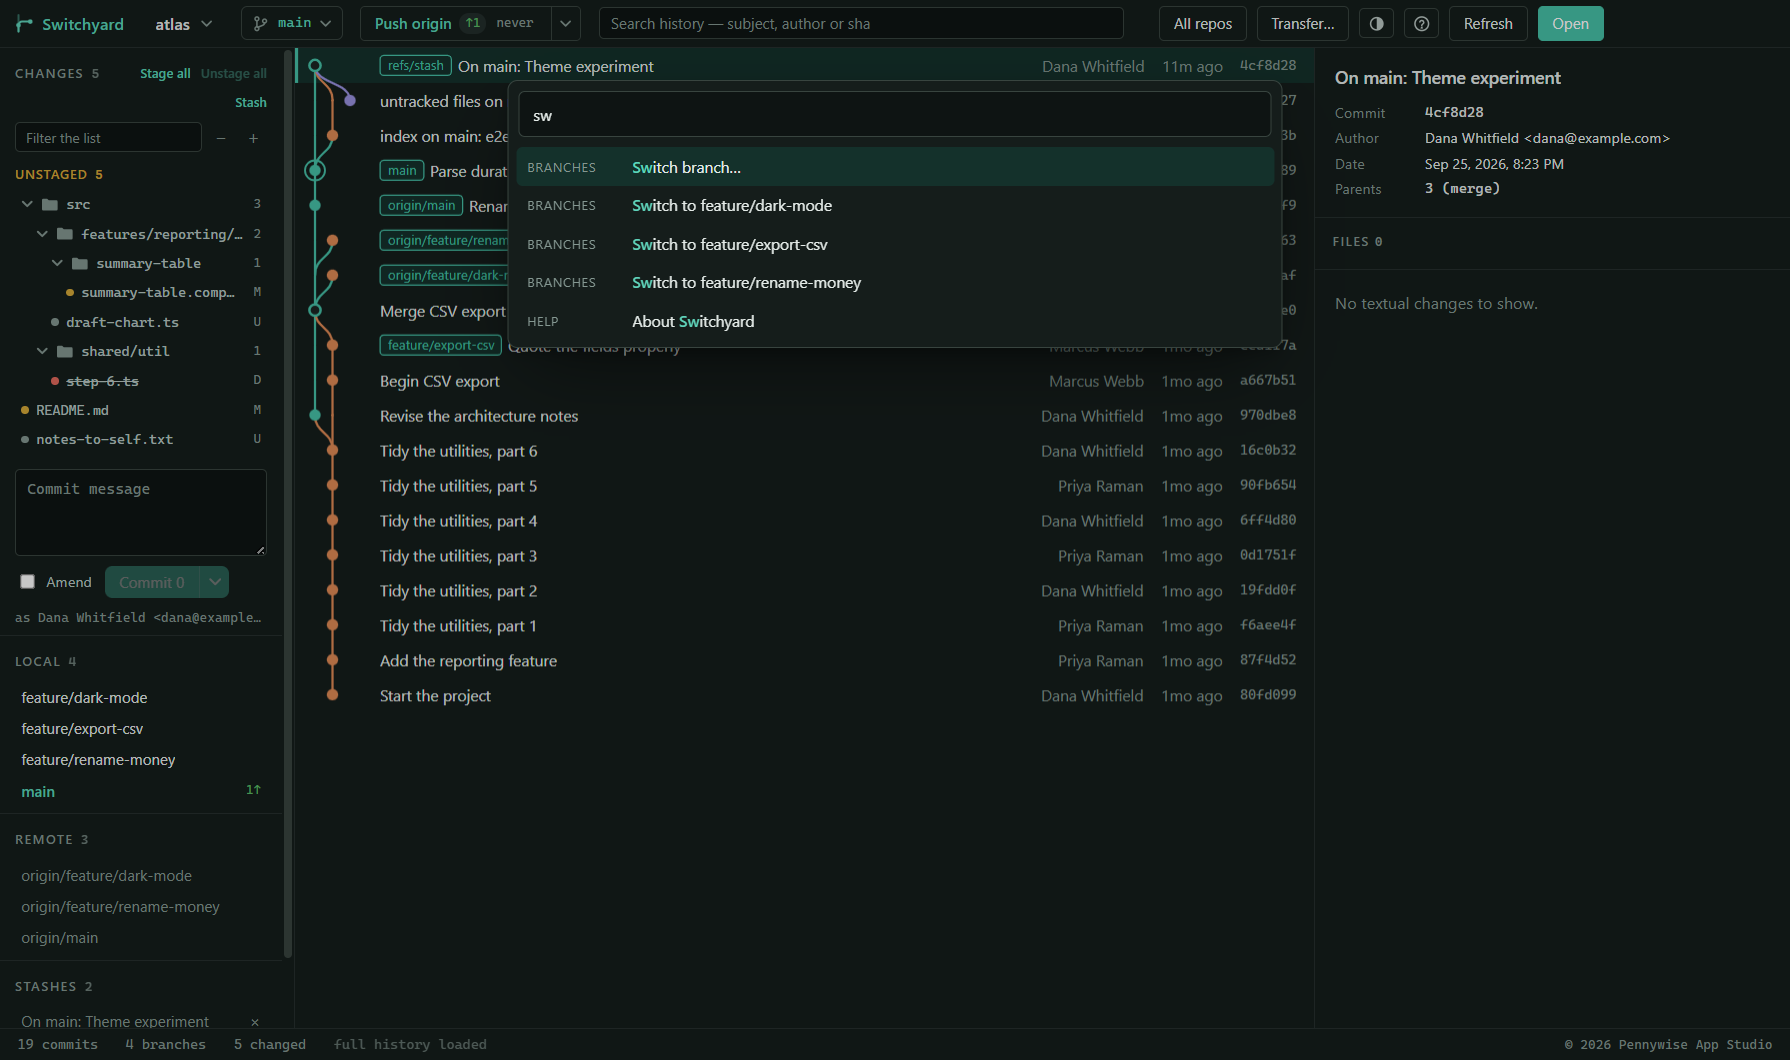
Ctrl+Shift+P opens a box that can do anything in the app:
every action, every branch to switch to, every open repository to go to. Type a few letters
of what you want — they only have to appear in order, so sw feat finds
Switch to feature/login — then ↑ ↓ and Enter, or
click. Each entry shows its own shortcut, if it has one. Only what can be done right now is
listed. It is also in the Help menu as All commands…
Repositories
Opening several at once
The repository name at the top left is a menu of every repository you have open, with the branch each one is on. Pick one to switch to it. Up to ten can be open; opening an eleventh closes the one you have used least recently. The set is remembered between runs.
Below them, Recent lists repositories you have opened before and closed since, so one is a click away rather than a trip through the folder picker. The × beside one only takes it off the list; nothing on disk is touched. You can also drag a folder from Explorer onto the window to open it.
- Ctrl+1 … Ctrl+9 jump to a repository by its position in that menu.
- Ctrl+Tab goes back to the one you used before, the way a window switcher does.
- Ctrl+W closes the current one. Nothing on disk changes.
Cloning
Clone repository… asks for three things: the address (an https:// URL,
an SSH address such as git@github.com:owner/repo.git, or a local path), the
folder to clone into, and the name of the new folder, which fills itself in from the
address. The dialog shows the exact folder it will create. Progress is shown as git
reports it, and Cancel clone (or Esc) stops it and removes the
half-made folder. The folder you chose is remembered for next time.
A folder that already has files in it is refused rather than mixed into.
Remotes
Remotes… in the repository menu lists each remote with its address. Edit changes its name or address, Remove takes it away, and the row at the bottom adds a new one by name and address.
Open in your editor or terminal
The repository menu opens the repository's folder in your editor (Ctrl+Shift+A) or in a terminal (Ctrl+`). Choose the editor and terminal… lists the ones found on your computer — Visual Studio Code, JetBrains IDEs, Visual Studio, Sublime Text or Notepad++, or Another program…; and Windows Terminal, PowerShell, Command Prompt or Git Bash. A file's right-click menu can open the file itself in the editor you chose.
From a terminal
Help → Command-line helper (or the palette) installs a switchyard
command. After that, switchyard . in any terminal opens that folder in
Switchyard. It needs no administrator rights. If the folder cannot be opened, the window
says why.
All repositories at a glance
All repos in the top bar lists every open repository with what is staged, changed, untracked, conflicted or not yet pushed, most urgent first. It is read when you open it — press Refresh in the panel for a fresh reading. Click a row to go to that repository. A repository that has been moved or deleted keeps its row and says so.
The commit graph
Every branch keeps its own column for as long as it exists, so the shape of the history holds still while you read it. A hollow dot is a merge; a ring around a dot is the commit you have checked out. Branch names are filled labels and tags are outlined ones.
- Click a commit to see it on the right. ↑ and ↓ move through the history.
- Ctrl-click adds a commit to a selection, and Shift-click selects a range.
- Right-click for the commit menu: copy its id or message, copy the files it changed, create a branch or a tag there, check it out, reset your branch to it, cherry-pick it onto your branch, rewrite the history after it, go back to an earlier point, revert it, undo it (on the newest commit), copy files to another repository, or open it on GitHub, GitLab or Azure DevOps (see Links).
- Search (Ctrl+F) filters by message, author or the start of a commit id. While a search is on, only the matching commits are shown and the lines between them are hidden, because commits that are next to each other in the results are not necessarily parent and child.
- The first 2,000 commits load at once. More load as you scroll to the end, or with Load more history at the bottom.
Searching by path or by text
In the same box, path:invoice finds the commits, on any branch, that touched a
file or folder with invoice in its name, and text:ReviewNotes the
commits that added or removed exactly that text. These search the whole history, not only
what has loaded so far. The count beside the box says how many match, and if some are older
than what has loaded, Read further back reaches them.
Resetting a branch to a commit
Reset branch to here… in the commit menu says how many commits would leave the branch, warns if any of them are already on the remote, and asks what should happen to the changes: Keep my uncommitted changes (and drop what those commits did), Keep what those commits did, staged (to commit again as one), or Discard everything after it. Each can be undone straight afterwards.
A commit's details
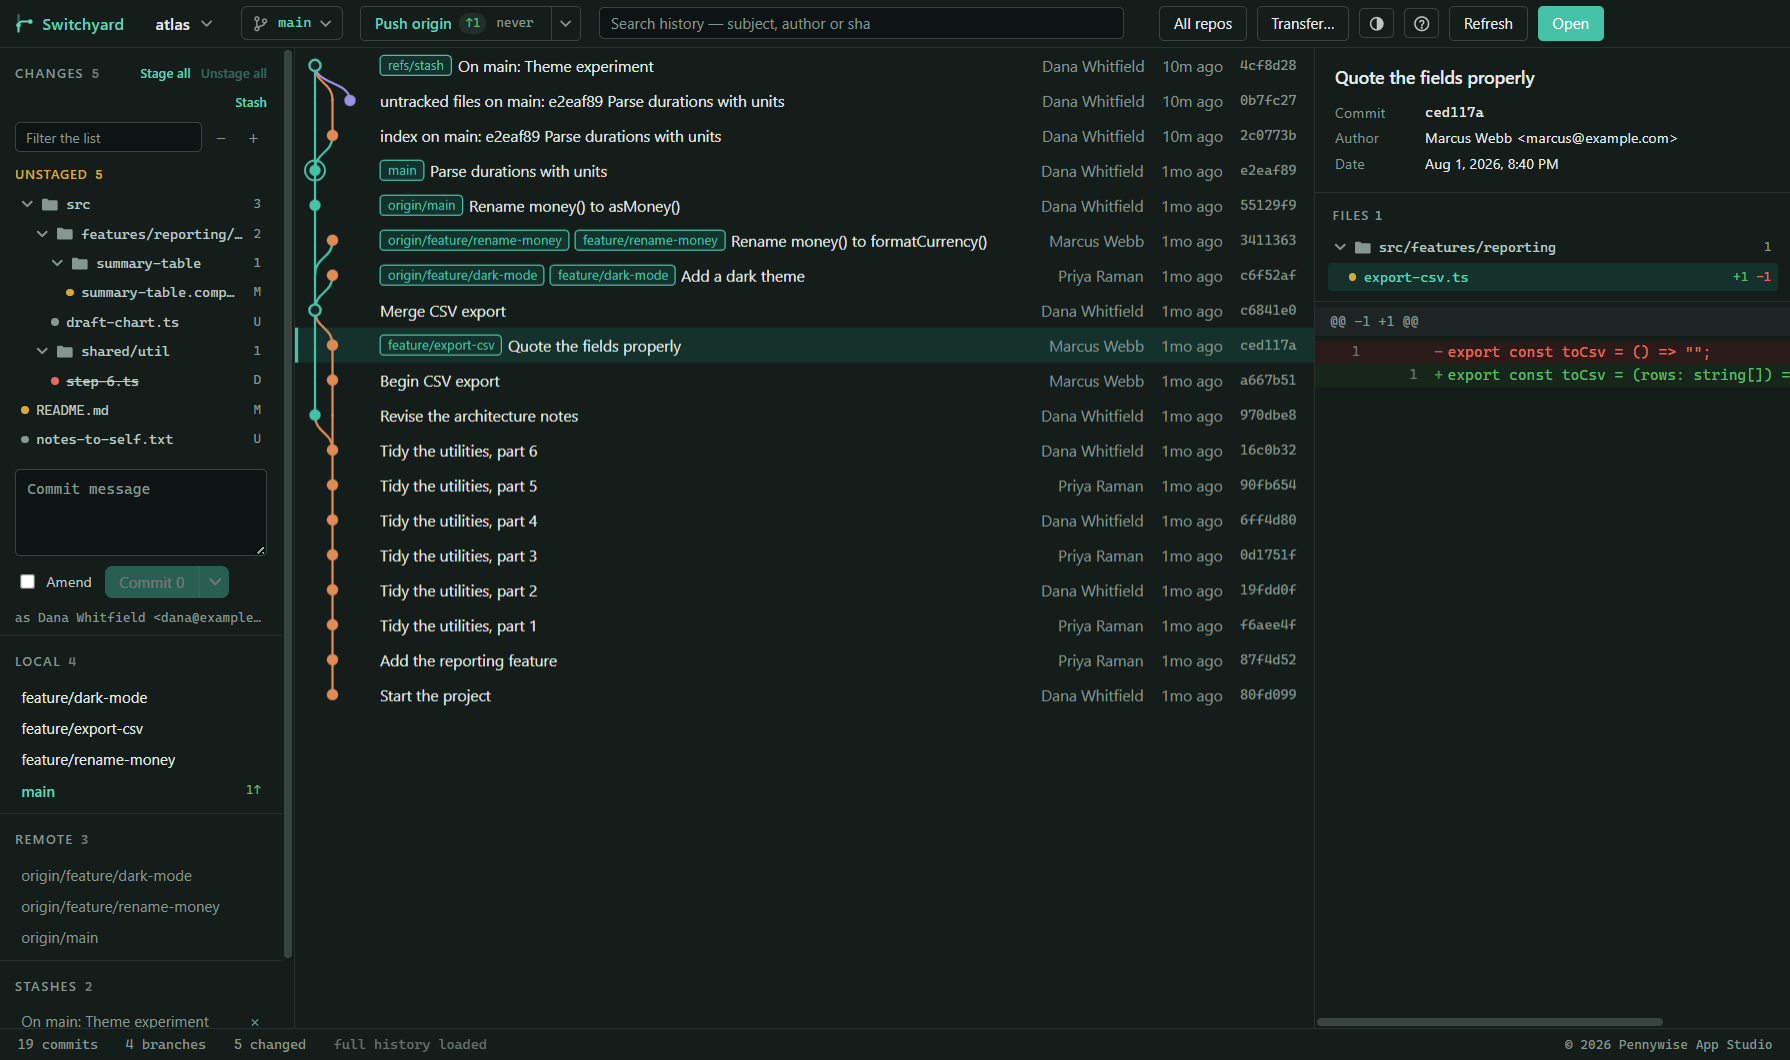
The right-hand panel shows the selected commit's message, author and date, the files it changed as a folder tree, and the diff of the selected file.
- Double-click a file to open it side by side against the commit's parent.
- Right-click a file, here or in the Changes list, for its menu: Open, Open with… (Windows' own chooser), open it in your editor, Show in Explorer, compare it side by side, View history, Blame, Copy path and Copy full path. In the Changes list it also offers Stage, Stash this file, Discard changes… and Unstage. A deleted file cannot be opened, so its menu shows its folder instead.
- Ignoring files, from the same menu: a new file offers Ignore this file,
Ignore every *.log file (for its own extension) and Ignore the folder; a
tracked file offers Stop tracking and ignore…. Edit .gitignore… opens the
repository's
.gitignoreto edit by hand. - With two or more commits selected, the commit menu offers Compare oldest with newest.
Reading a diff
When a line is changed rather than added or removed, the words that changed are marked in both its old and its new version, here and in the side-by-side window. Code is coloured by its language — TypeScript and JavaScript, JSON, CSS and SCSS, HTML and XML, C#, Java, Python, Go, Rust, SQL, YAML, Markdown, shell scripts and PowerShell. Untick Colour syntax, above the diff, to turn colours off, and tick Hide whitespace changes to leave out changes that are only spacing. Both choices are remembered.
A line that looks unchanged but is marked removed and added again carries an invisible change label: the two differ only in characters you cannot see, such as a byte order mark (shown as a BOM badge), spaces at the end of the line, or its line ending.
Pictures
A changed PNG, JPEG, GIF, WebP, BMP, ICO or AVIF file is shown as the picture before and after, side by side (one above the other when the panel is narrow), each with its dimensions and size, on a checkerboard so a transparent picture's edges show. This works for a commit's files, for what is staged and for what is changed on disk. A new picture shows only its after, and a deleted one only its before. A picture over 16 MB is said to be too large rather than loaded, and one kept by Git LFS says so: git holds only a pointer to it, and Switchyard never fetches it from the network.
A file's history and blame
View history and Blame, in any file's right-click menu, open a window of their own for that file, with a tab for each.
- History lists every commit that changed the file, newest first, and follows it through renames — such a commit says renamed from …. Pick one, or use ↑ ↓, to see what that commit did to the file.
- Blame shows each line beside the commit, author and date that last changed it, and counts the lines not committed yet. Click a line's commit to see it in the History tab.
A file that has never been committed has no history yet, so its menu does not offer either.
Side-by-side compare
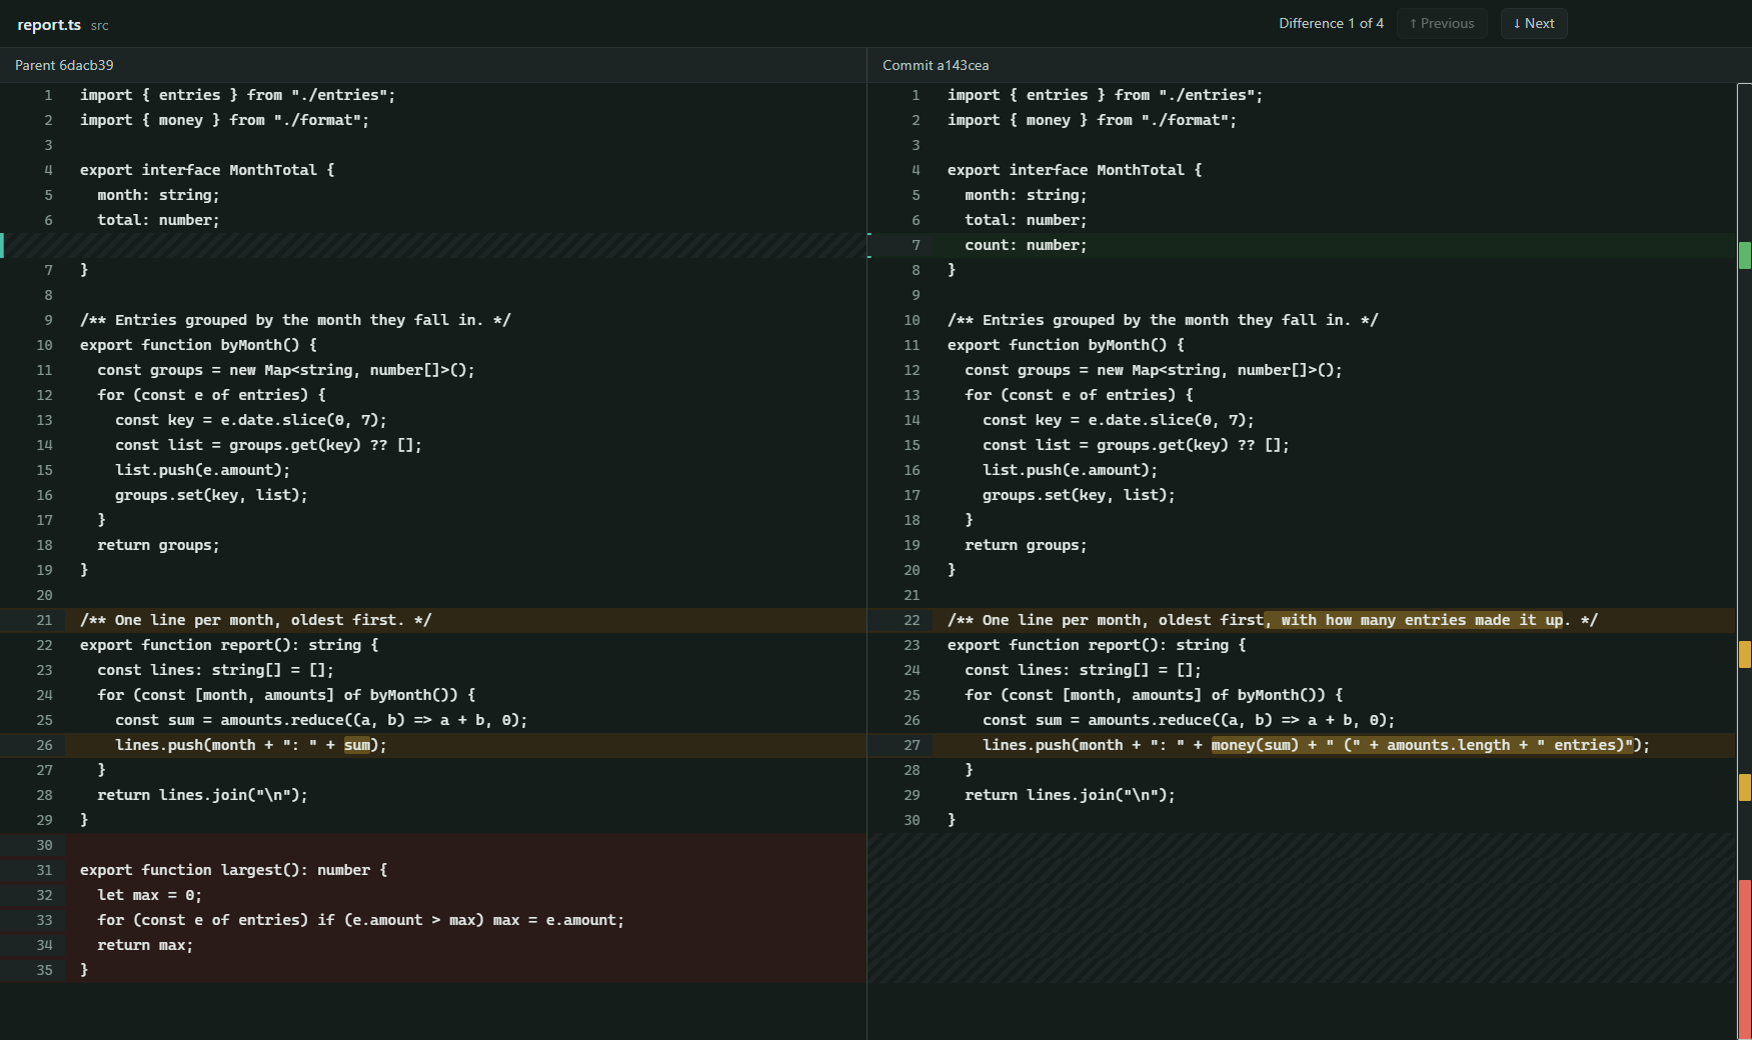
Double-clicking a file — in a commit, or in the Changes lists — opens both versions side by side in a window of their own, the way WinMerge shows them. Both panes scroll together, down and across, and the part of a changed line that differs is highlighted.
| Double-clicked in | Left | Right |
|---|---|---|
| A commit's files | The commit's parent | The commit |
| Staged | The last commit | What is staged |
| Unstaged | What is staged | The file on disk |
- Next and Previous in the window's bar move between differences — or Alt+↓ / Alt+↑, or F8 / F7. The window opens on the first one.
- The location bar down the right edge marks every difference in the whole file. Click it to jump.
- A missing line is hatched, so "nothing here" is never confused with an empty line.
- Esc closes the window. It never changes anything.
Files saved in an older Windows encoding rather than UTF-8 are read as Windows-1252, so characters like é and € show as themselves, and the window says so in its title bar. Staging such a file, a hunk or a line at a time, keeps its bytes exactly.
Changes and staging
The left panel shows what is Staged for the next commit and what is Unstaged, each as a folder tree. Hover a row for its buttons: + stages, − unstages, and × discards. Folder rows act on everything inside them. Stage all, Unstage all and Stash sit above the lists, and the filter box narrows them; while it is on, each heading counts what it shows, as in Unstaged 3 of 147. Stage all leaves merge conflicts alone; they are settled in their own list (see Resolving conflicts).
Staging part of a file
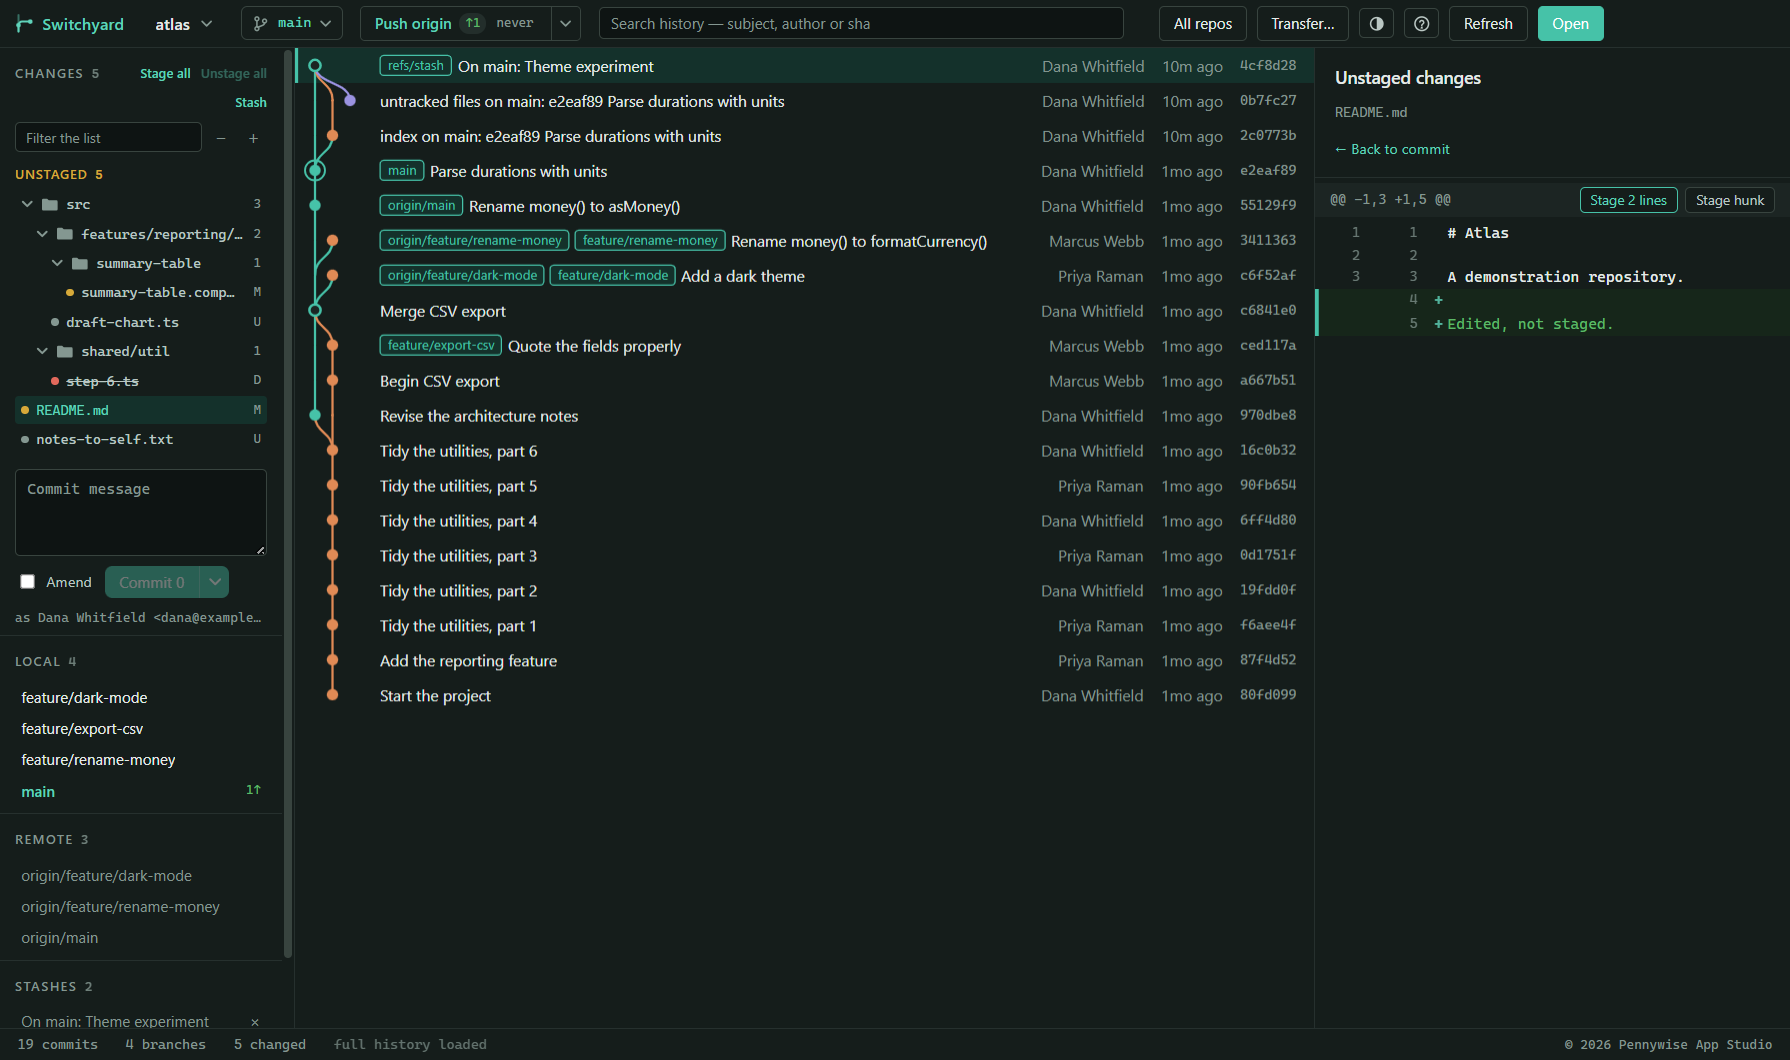
Click a file to see its diff. Each block of changes (a hunk) has a Stage hunk button, or Unstage hunk when you opened the file from the Staged list, so one file's changes can go into different commits. A file that is in both lists shows whichever side you clicked. New, deleted, renamed and binary files are staged whole.
For less than a hunk, click the added or removed lines you want — Shift-click picks a run of them — and press Stage 2 lines (or Unstage) in that hunk's header. Picked lines are marked down their left edge.
If the file changed on disk after its diff was drawn, the hunk or lines are refused rather than guessed at, and the diff is redrawn. With Hide whitespace changes on, show whitespace again to stage part of a file.
Discarding
Discarding always asks first, and for a folder it lists the files it would throw away. Git keeps no record of an uncommitted edit, so Switchyard keeps a copy before it discards: Undo in the message that follows, or Ctrl+Z, puts the files back exactly as they were. In an unstaged diff, Discard hunk throws away one block of changes, and with lines picked, Discard 2 lines just those; both can be undone the same way.
Warned before a conflict
When files you have changed are also changed by commits on the upstream that you have not pulled, each is marked with a !, and a line at the top of the list says how many there are and how long ago you last fetched. Pulling sooner means a smaller conflict.
Stashes
Stash puts every change, including new files, aside; Stash this file in a file's menu puts just that one aside. Stashes are listed in the left panel: click one to bring its changes back (it leaves the list once applied), or × to delete it. Right-click one for Apply, and keep it, Apply, and remove it, New branch from it… and Delete it…. The newest also shows in the history as one row marked stash; select it to see everything it holds, new files included.
If bringing a stash back conflicts with what is there now, Git keeps the stash in the list and leaves the files conflicted. Resolve them, or press Undo the stash apply… in the banner: it lists the files it will put back first, keeps your other unstaged work, and the stash is still there to try again.
Committing
Write a message and press Commit, or Ctrl+Enter from the message box. The button says what it will do — Commit 3 files — and, until it can, the line under it says why not. The line below that says who the commit will be attributed to; click it to commit as someone else (see Identities).
Amend changes the newest commit instead of making a new one, and brings its message back to edit. With nothing staged it just rewords the message. Untick it and the message it brought back goes away again; anything you typed yourself stays.
The arrow beside Commit offers Commit and push (Commit and publish for a branch not yet on the remote) and Commit and sync, which pulls first and then pushes. The main button always just commits. If the push or pull fails, the message says the commit was made and what stopped the rest.
Undo last commit… (right-click the newest commit) takes it back and leaves its changes staged; Revert this commit… adds a new commit that reverses an older one. A merge is reverted against the branch it was made on. Any commit or amend can also be undone straight afterwards from the message that follows it (see Undo).
Identities and team settings
Identities
Keep several names and email addresses — for work and for your own projects — each with an
SSH key if you like, and say which goes with which repository. Click the
as Name <email> line under the commit box, then
Manage identities and SSH keys…. Each identity has a label, a name, an email, an
optional SSH key and rules, one per line: folder:D:\work for repositories
inside a folder, remote:github.com/acme for those whose remote address
contains it. The first identity whose rule matches wins.
Choosing an identity writes that repository's own git config, so git in a terminal commits the same way. When a repository is set up as someone other than its rule says, the commit box warns before you commit, with a Use … button that puts it right. Identities are saved on this computer only.
Team settings
Team settings (from the command palette) are saved in a .switchyard.json
file at the top of the repository. Commit it, and everyone who uses Switchyard there gets
the same:
- Commit message template, put in the message box for each new commit.
- Message pattern and Branch name pattern, as regular expressions, each with the words to show when something does not match. A message that does not match is warned about; a new branch name that does not match is refused when the branch is made.
- Protected branches, separated by commas (
main, release/*). Committing on one is warned about, pushing to one asks first, and deleting one on the remote says it is protected.
Branches and merging
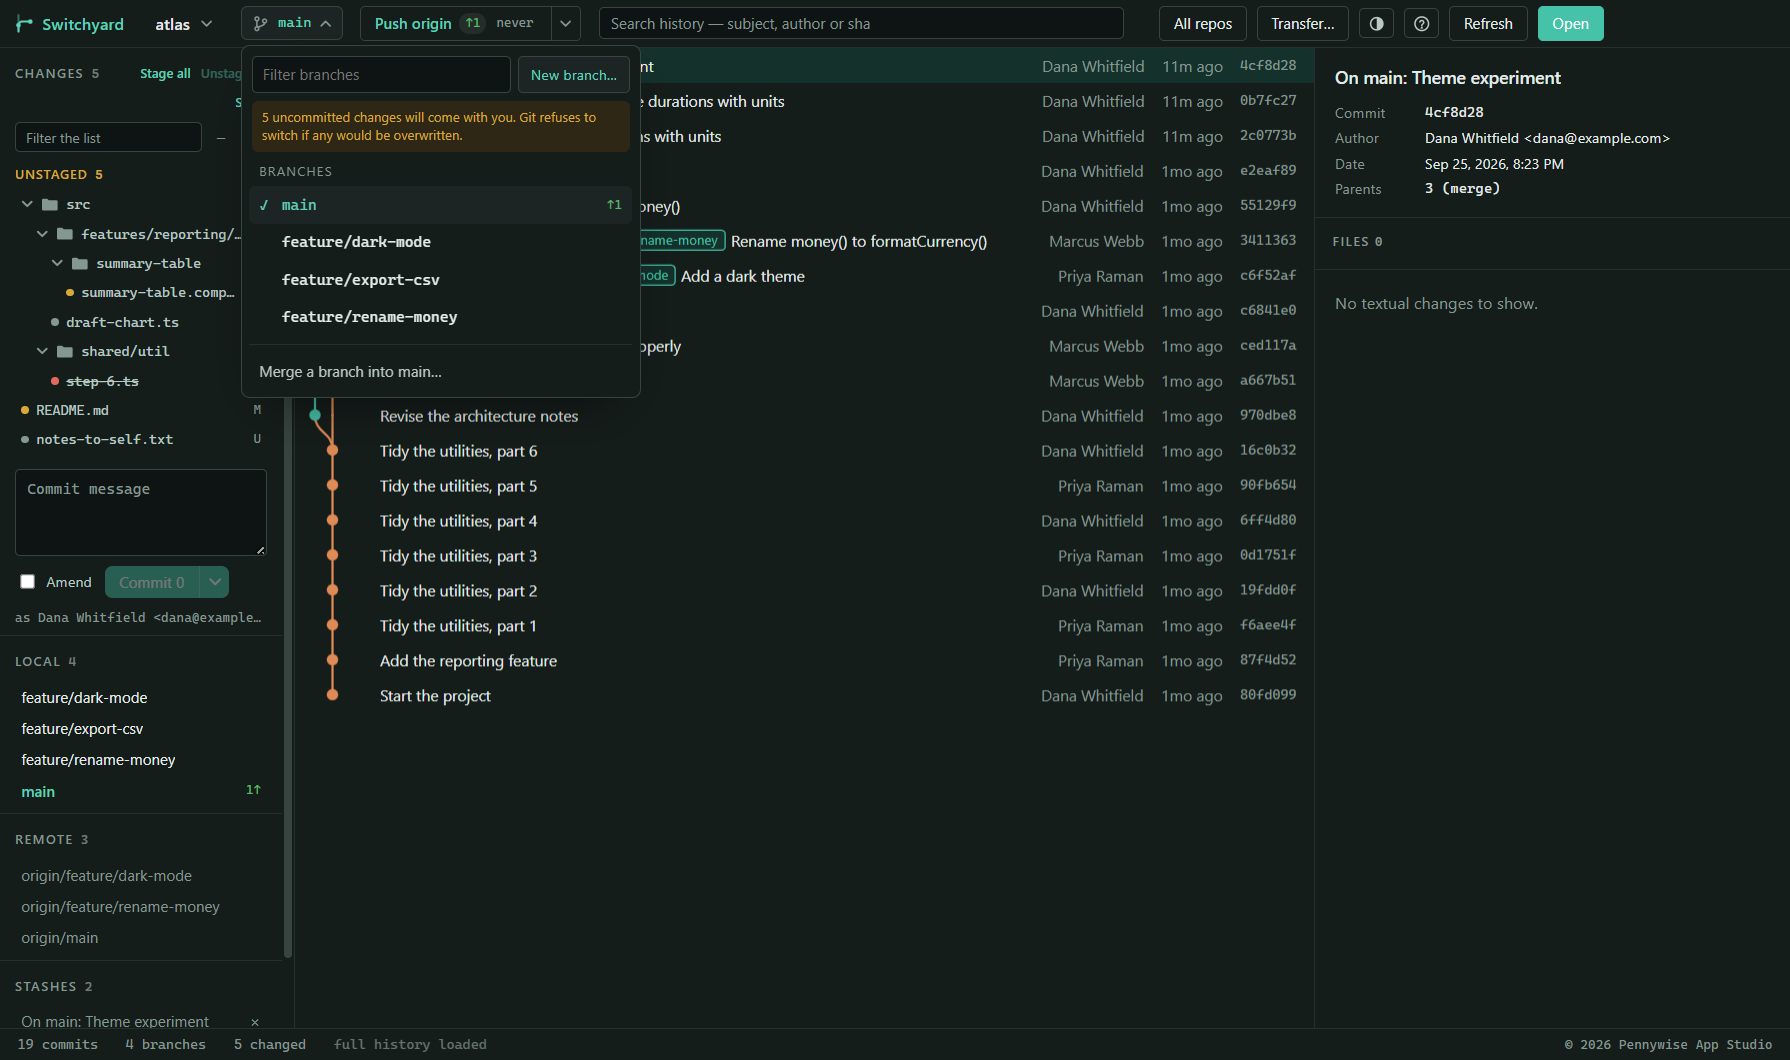
The button next to the repository name shows the current branch and opens the branch menu. Type to filter it; ↑ ↓ and Enter pick one.
- Branches lists your local branches, with how far each is ahead (↑) or behind (↓) its remote.
- On the remote only lists branches that exist only on the remote. Picking one makes a local branch of the same name that tracks it.
- New branch… makes a branch from where you are and switches to it.
- Merge a branch into … lists the other branches; choose how — Fast-forward when it can, Always a merge commit, Only a fast-forward or Squash into one change (staged for you to commit) — then pick a branch and confirm.
Switching with uncommitted changes
If you have uncommitted changes, switching asks what to do with them: Bring them to … the branch you are going to, as git would, or Leave them on … the branch you are leaving, set aside until you come back. When you return, the Changes panel offers Bring them back. If a switch would overwrite any of them, Git refuses and nothing changes. You can also switch by clicking a branch in the left panel.
Branch, tag and stash menus
Right-click a branch in the left panel or the branch menu to switch to it, merge it, rebase onto it, rename it, change or stop what it tracks, or delete it, here or on the remote. A tag (click or right-click it) can be checked out, pushed, deleted here or on the remote, or given a branch. From the commit menu, Create a branch here… and Create a tag here… make one at that commit. Deleting a branch or tag, here or on the remote, and renaming a branch here, can be undone from the message that follows.
Fetch, pull and push
One button does what the branch needs next, as GitHub Desktop's does:
| The button says | When |
|---|---|
| Publish branch | The branch is not on the remote yet. |
| Pull origin ↓2 | The remote has commits you do not. A push would be refused until you pull. |
| Push origin ↑1 | You have commits the remote does not. |
| Fetch origin | Nothing is known to be waiting either way. |
| No remote | The repository has no remote to talk to. |
origin stands for whatever your remote is called, and the button always names the
remote the action really uses. Pull and fetch use the remote the branch tracks; with several
remotes, fetch reads them all and says Fetch all remotes. A push goes where Git itself
would send it: the branch's own pushRemote if you set one, else
remote.pushDefault, else the remote it tracks — so a fork you push to and an
upstream you pull from each get named correctly. A new branch is published the same way,
falling back to origin, else the only remote there is.
The small age beside it, after a clock — now, 12m, 3h,
2d or never — is how long ago the remote was last read. The counts
are only as fresh as that. The arrow beside the button offers every action directly:
Fetch, Pull, Pull with merge or Pull with rebase (whichever your
settings do not already do), Push and Force push…. Force push uses
--force-with-lease, so it is refused if someone else has pushed since you last
fetched, and it always asks first.
Progress, and stopping
While a fetch, pull or push runs, the button fills as git works and says how far it has got; its tooltip has the size and the speed. While stopping is safe, the arrow beside it becomes a stop button: a download can be stopped, and nothing is changed. A merge, or a push that has already sent everything, has to finish, and says so. A long download is not cut off by a time limit as long as data keeps arriving.
How pull works
Pull follows your own git settings — merge, rebase, or fast-forward only — and the menu says which it will do. If a fast-forward-only pull cannot fast-forward, the message offers Pull with merge and Pull with rebase. If a pull is refused because of uncommitted changes in the way, it offers Set them aside, pull, and bring them back.
Fetching by itself
Every 15 minutes, while the window is open, the repository on screen is fetched in the background, so the counts on the button are worth believing. It shows no progress, never asks you to sign in, and gives way the moment you fetch, pull or push yourself. If it cannot fetch, the fetch age turns amber and its tooltip says why. Turn it off, or back on, with Fetch automatically in the button's menu.
Signing in
When a remote wants you to sign in and your own credential helper has nothing to give, Switchyard asks in the window: a username and password (or token) for an HTTPS remote, the passphrase of an SSH key, or an SSH agent's confirmation. A server your computer has not met before shows its key's fingerprint to compare before you choose Trust and connect. The dialog names the server the answer goes to; the answer goes to git and nowhere else, and Switchyard does not store it. Your credential helper keeps it once it works, as it would in a terminal, and the dialog tells you if no helper is set up, so git will ask again next time. Cancel, or Esc, stops what asked.
Pull requests
When a repository's remote is on GitHub, GitLab or Azure DevOps — including GitHub Enterprise, self-hosted GitLab and Azure DevOps Server — the left panel has a Pull requests section listing the open ones.
Connecting
Press Connect to see its pull requests and paste a personal access token of your own: on GitHub with Pull requests and Contents read and write, on GitLab with the api scope, on Azure DevOps with Code read and write. The dialog has a link to the page that makes one. The token is checked with the service, kept on this computer encrypted by Windows so only your account can read it, and sent only to that service — never to Switchyard. Disconnect, under the list, forgets it.
For a server Switchyard does not recognise, say what kind it is. For Azure DevOps Server,
the collection is suggested from the remote's address for you to confirm. A server on plain
http:// is never sent your token unless you tick
Send it over http anyway, to this server only.
Working with a pull request
- Click one to see its title, description, author and branches. Check out fetches it into a branch named
pr/and its number, and switches to it; Open in the browser shows it on the service. - Approve it, or write a comment and press Send comment.
- Merge… merges it the way you choose (with a merge commit, squashed or rebased, as the service allows), after a confirmation, and can delete its branch afterwards. A pull request goes in as it stood when you read it: if anything was pushed to it since, the service refuses rather than merge what you have not seen. A draft cannot be merged.
- New opens one from the branch you are on: a title, a description, the branch it goes Into, and whether it is a draft. If the branch is not on the remote yet, Push and create pushes it first.
Pull requests go through Windows' own proxy settings and trust the certificates Windows trusts, so they work on a network where everything passes through a proxy. When the service cannot be reached, the panel says why in plain words. A proxy that asks for a sign-in of its own is not supported yet.
Links to GitHub, GitLab and Azure DevOps
When a repository's remote is on one of these services, the menus offer its pages, and a link to copy and paste where people talk about the work:
- A commit — Open on GitHub (or GitLab, or Azure DevOps) and Copy link in the commit menu.
- A branch — the same two in its right-click menu.
- A file in a commit — Open on … at this commit and Copy link at this commit in its right-click menu.
- The repository — Open on … and Copy its link on … in the repository menu.
A commit not pushed yet, or a branch not published, has no page there, so instead of a link that leads to "not found" Switchyard says to push or publish first. The page opens in your browser; Switchyard itself sends nothing to the service.
Rewriting history
Cherry-pick
Right-click a commit from another branch — or several, Ctrl-clicked — and choose Cherry-pick onto … to copy them onto your branch, oldest first. Commits your branch already has are not offered, and merge commits are refused. If a pick conflicts, the conflict banner takes over, as for a merge.
Rewrite history (interactive rebase)
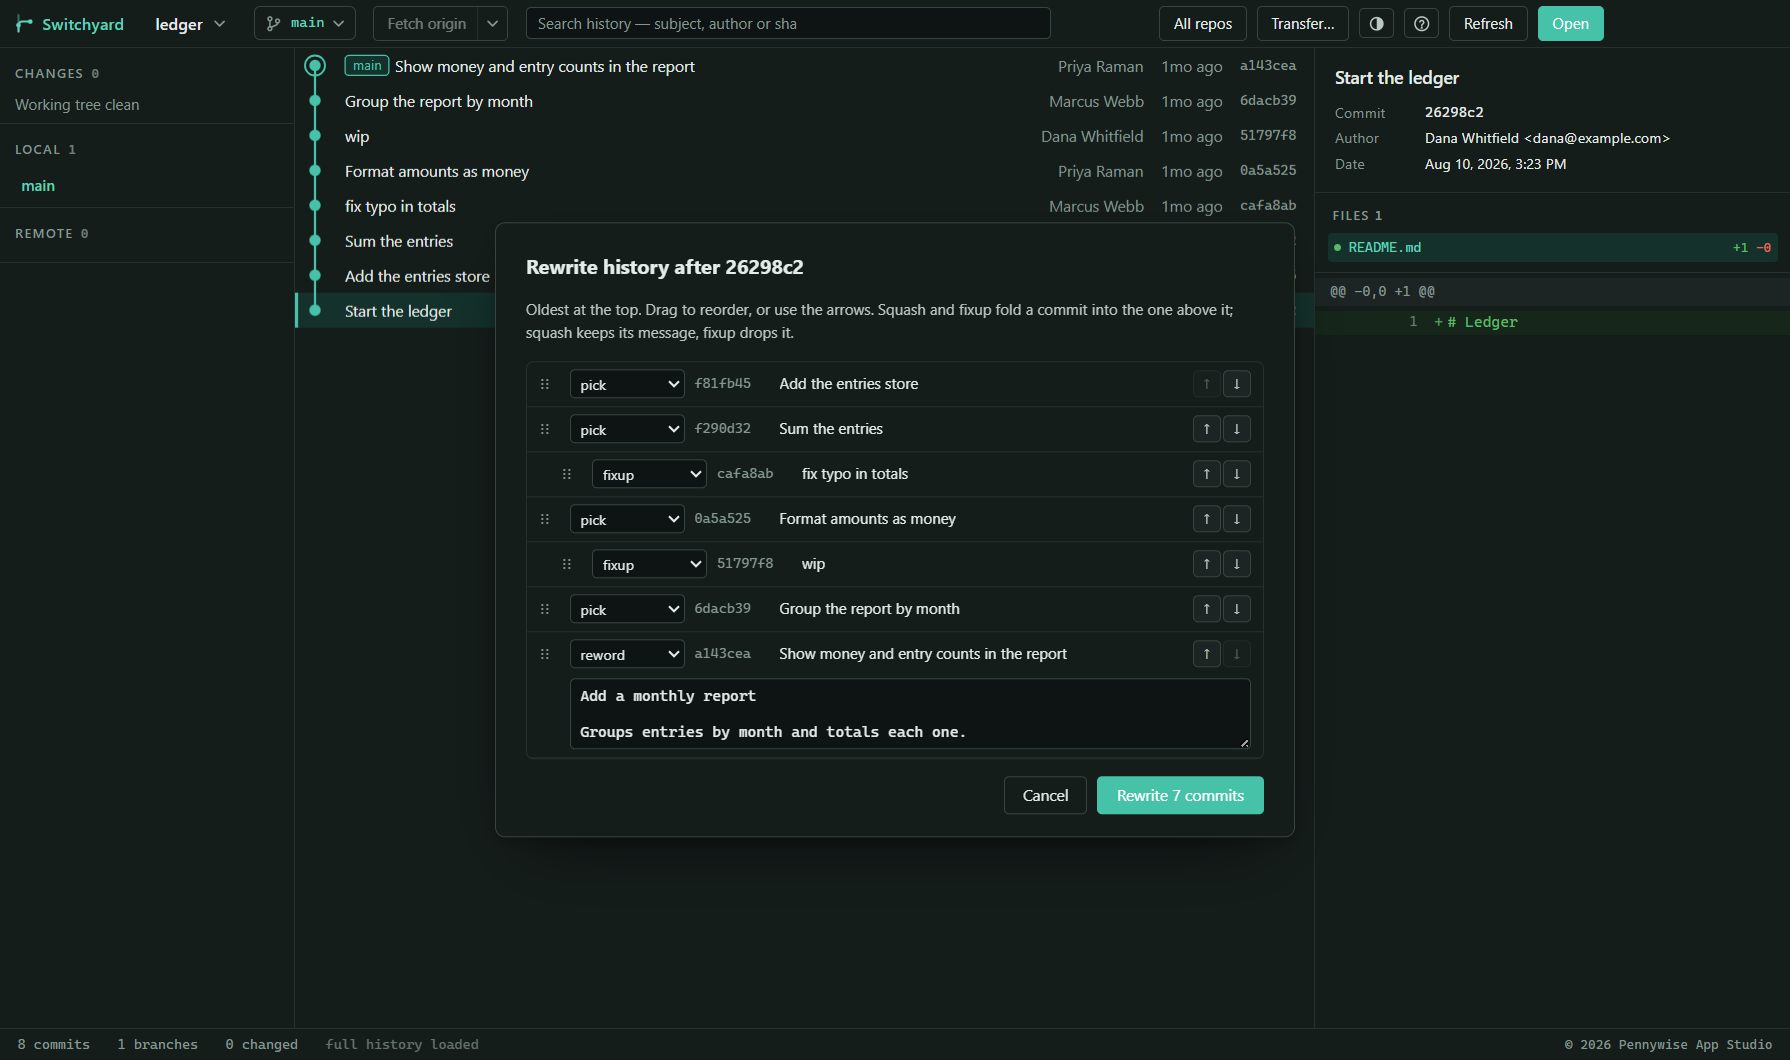
Right-click a commit on your branch and choose Rewrite history after this commit…. Every commit after it is listed, oldest at the top. Drag them — or use the arrows — to reorder, and choose for each one:
| pick | Keep it as it is. |
| reword | Keep it with a new message, typed in place. |
| squash | Fold it into the commit above, keeping both messages. |
| fixup | Fold it into the commit above, dropping its message. |
| drop | Leave it out. |
The dialog warns when some of the commits are already on the remote, because rewriting them means a force push. Commit or stash your changes first. If a step conflicts, resolve it and press Continue, Skip to go on without that commit, or Abort to put everything back as it was.
Go back to an earlier point
Git remembers every place your branch has been — after each commit, reset, merge, pull or rebase. Go back to an earlier point… in the commit menu (or the palette) lists them, newest first. Choose one and you are told which commits would leave the branch and which would come back before anything moves. Uncommitted changes are kept, and the move is itself remembered, so it can be undone the same way.
Undo
Most things you do can be taken back straight afterwards: commits, amends, merges, pulls, cherry-picks, history rewrites, resets, discards, deleting a branch or tag (on the remote too), renaming a branch, and every choice made while resolving conflicts. The message that follows the action has an Undo button; Ctrl+Z (outside a text box) and Undo … in the command palette do the same.
- The last action in each repository can be undone, as long as nothing has moved on since. Once the branch or the file has changed again, it is no longer offered.
- A discard is kept byte for byte, so undoing it gives back exactly what was there.
- Nothing that has reached a remote is undone: a commit that was already pushed is refused, because others may have pulled it.
Resolving conflicts
When a merge, pull, rebase, cherry-pick, revert or stash apply stops on conflicts, a banner at the top of the Changes panel names the operation and how many files are left, and the conflicted files are listed first, under Merge conflicts, apart from your other changes. Current is your branch; Incoming is the branch, commit or stash being brought in. (During a rebase, current is what has been rebased so far, and incoming is your own commit.)
- Each conflicted file has two lines: its name, then the kind of conflict in git's own words, such as [both modified] or [deleted by them], with its buttons always in sight. current and incoming take that side for the whole file — when that side deleted the file, taking it deletes the file, and the tooltip says so. merge…, for a file both sides edited, opens the three-pane merge editor.
- With more than one file, All current and All incoming in the banner take a side for every one.
- Continue finishes the operation once nothing is left unresolved. A rebase, cherry-pick or revert also offers Skip, to go on without the commit it stopped on. Abort puts everything back as it was before it started.
Seeing a conflict
Click a conflicted file to see it on the right: the file itself, at its real line numbers, with each conflict laid out as two labelled blocks — Conflict 1 — Current and Incoming, each naming its branch — and long unchanged stretches folded. If your git is set to show the common ancestor, a third block shows the text before either change.
- Settle one conflict at a time with Take current, Take incoming or Take both (current first) under its header. The file is written, not staged, and the other conflicts stay as they are until you get to them.
- ↑ Previous and Next ↓, or F7 and Shift+F7, move between conflicts. Wrap long lines and Colour syntax are beside them.
- Above the file, Open merge editor, Take current and Take incoming act on the whole file, and Open file opens it to edit the markers out by hand. Edits made in another editor show up here each time you save.
- Mark resolved stages the file as it is. If conflict markers are still in it, it warns you first, because git would take the markers as the resolution.
Files that are not two texts to merge
- Pictures in conflict show both versions side by side. Other non-text files show each side's size; take one side.
- A file deleted on one side says which side deleted it and which changed it, and the buttons say whether they keep it or delete it.
- A file renamed differently on each side says what each side renamed it to, so you can keep one name and delete the other.
Undoing a choice
Taking a side, for one file or for all of them, and settling a single conflict can be undone straight afterwards, from the message's Undo or with Ctrl+Z. The conflict comes back exactly as it was, along with any edits you had made by hand.
In the merge editor
| Alt+↓ / Alt+↑ | Next / previous conflict |
| Alt+← | Take your side of the current conflict |
| Alt+→ | Take their side |
| Alt+B | Keep both |
| Esc | Close the editor |
The file can only be saved once every conflict in it has a choice.
Copying files between repositories
Transfer… in the top bar copies named files from one checkout to another — for example, carrying a set of changed files to a release branch checked out elsewhere. Paste the file names (full paths or bare names; a bare name that matches more than one file is reported rather than guessed), choose the source and destination repositories, and press Done to see a review of what would change, with a diff for each file. Untick anything you do not want, then copy. Overwriting an existing file always asks first.
With commits selected in the graph, the list fills itself with the files those commits changed. Destinations you have used are offered in the destination box.
Lists of changed files
Right-click a commit, or a selection of several, and choose one of the Copy changed objects formats to copy the list of files they changed: one per line with a comma after each, all on one line separated by commas, or plain lines. Files the commits deleted are left out of that list, since there is nothing to ship. When there are any, the menu adds Copy deleted objects, and after a copy the status bar says how many were left out, with a Copy deleted button beside it. A file deleted and then added back within the selection counts as changed; the old name of a renamed file counts as deleted. Copy files to another repository… fills in its list exactly as before. Review changed objects… shows the list with each file's commits, and marks the files more than one commit touched: those are the ones where shipping a single commit would ship the wrong version. Ctrl+Shift+C copies the list for the current selection.
Layout and themes
- Drag the edge of the left or right panel to resize it. With the edge focused, ← → resize it and Home resets it; double-clicking also resets it. Widths are remembered.
- Move a panel by dragging its grip (Sidebar or Details, at its top), or press the grip for the same choices in a menu: the sidebar on the left or the right, the details on the left, the right, or below the graph, where the diff gets the window's whole width. The layout is remembered, and Put the panels back where they started in the palette resets it.
- Hide a panel with the − beside its grip, Ctrl+B (the sidebar) or Ctrl+J (the details). A thin rail is left where it was; click it, or press the same keys, to bring it back.
- The theme button cycles between following Windows, light and dark.
- On a narrow window the top bar's labels give way to icons; hover one for its name.
Updates
From version 0.1.10 Switchyard updates itself. It checks shortly after it starts and every few hours, downloads a new version in the background, checks it against the release's fingerprint, and then shows Switchyard … is ready to install. Press Restart to update, or Later — it then installs the next time you quit. Check for updates in the Help menu asks straight away and says what it found. What changed in each version is in the release notes, which Help → Release notes opens.
Coming from 0.1.8 or earlier? Uninstall the old version first (Settings → Apps → Installed apps), then install the new one. Your open repositories and settings are kept.
What the app sends and checks
Nothing about your code leaves the machine: no repository paths, file names, branch names, email address or machine name. To count installs, the app sends, once a day, a random id it made up the first time it ran, with its version and platform.
On launch and about hourly, it reads a status file for notices, updates, and a safety switch the developer can use to make a faulty version read-only or stop it. The app obeys the switch only when it is signed with one of the developer's keys: one never leaves the developer's own machine, and one is held by the website, which uses it only for the developer, after they confirm with a fresh code sent to their email. A switch lasts only for a set time, a year at most, and it never touches your repositories or files, or interrupts something git is already doing.
- Read-only shows a banner, Read-only for now, with the developer's message. Browsing history, diffs and branches keeps working; committing, staging, pushing and every other change wait.
- Switched off, the window shows only the developer's message, with the update and Quit. Git itself keeps working from a terminal.
Keyboard shortcuts
| Keys | Does |
|---|---|
| Anywhere | |
| F1 | Open this documentation |
| Ctrl+Shift+P | The command palette: any action, branch or repository |
| Ctrl+O | Open a repository |
| Ctrl+Shift+O | Clone a repository |
| Ctrl+1 … 9 | Go to an open repository |
| Ctrl+Tab | Back to the previous repository |
| Ctrl+W | Close the current repository |
| Ctrl+R | Read the repository again |
| Ctrl+F | Search the history |
| Ctrl+Z | Undo the last action (outside a text box) |
| Ctrl+Shift+A | Open the repository in your editor |
| Ctrl+` | Open the repository in a terminal |
| Esc | Close the topmost menu or dialog; then clear the search; then the selection |
| History and changes | |
| ↑ ↓ | Move through commits (with the graph focused) |
| Ctrl-click, Shift-click | Add to the selection, select a range |
| Ctrl+Shift+C | Copy the files the selected commits changed |
| Ctrl+Enter | Commit (from the message box) |
| Click, Shift-click a diff line | Pick lines to stage, unstage or discard |
| Conflicts (a conflicted file on the right) | |
| F7 | Next conflict |
| Shift+F7 | Previous conflict |
| Menus | |
| ↑ ↓ Home End | Move between items |
| Enter | Choose (in the branch menu, the highlighted branch) |
| Side-by-side compare | |
| Alt+↓ or F8 | Next difference |
| Alt+↑ or F7 | Previous difference |
| Esc | Close the window |
| Merge editor | |
| Alt+↓ / Alt+↑ | Next / previous conflict |
| Alt+← / Alt+→ | Take yours / theirs |
| Alt+B | Keep both |
| Panels | |
| Ctrl+B | Hide or show the sidebar |
| Ctrl+J | Hide or show the details |
| ← →, Home | Resize a focused panel edge, reset it |
Troubleshooting
- Git asks for a password, a token or a passphrase
- Switchyard asks for it in the window (see Signing in) and hands the answer to git alone. To be asked less often, sign in once with Git Credential Manager (it comes with Git for Windows) or set up an SSH key; your credential helper keeps what works.
- An SSH remote says the host is new
- The first connection to a new host has to be accepted once. Switchyard shows the host's key fingerprint: compare it with the one your service publishes, then choose Trust and connect.
- A switch or pull is refused because of local changes
- Git refuses rather than overwrite work. Commit, stash or discard the changes, or for a pull press Set them aside, pull, and bring them back in the message.
- Git says a lock file exists
-
A git that stopped early can leave
index.lockbehind, and every later command fails on it. The message offers Remove the lock…, after a confirmation. Since 0.1.20, Switchyard's own refreshes never lock the repository, so agit commitin a terminal no longer fails because Switchyard was open beside it. - Git refuses a folder another Windows account owns
- The message offers Trust this folder…, which tells git, after a confirmation, that the folder is yours to use.
- The history looks out of date
- Press Refresh (Ctrl+R). Changes on disk normally show up by themselves within a moment, including those made while a repository was still opening.